Monday, January 31, 2011

Peace Blooms


I get many compliments on the modge podge hand trees I made in our living room. I wanted to try this project again and trees are kind of my fave.

This winter I cut oodles of snowflakes out for the windows with Cricut Winter Lace cartridge. One of the flakes I loved is a peace sign flake. Then I thought- Hey! Those could easily become leaves!

I pulled out a previously painted green canvas and loads of scrapbook paper. I had my heart set on the owl paper for my tree so I tried to coordinate to it.


I cut flakes in sizes ranging from 3 inches to 6 inches. I arranged some on the canvas and realized it was way too busy! The peace sign and patterns were a jumbled mess.

I tried it out with just one patterned scrapbook paper at a time. I decided to go with the "flower power" paper. Its less busy and from a distance you can still make out the flowers.

The rest of the snowflakes went into the craft stash with a few ideas. Oh no this is not the end!

We've got the top part all ready! Next, is the trunk. I was going to trace my hand making a peace sign as the trunk. But, I wanted to try to fit it in with The CSI Project Typography challenge. My idea was to have the tree roots "sprouting" from the word PEACE.
Not really sure it's typography, but we will see if they remove me :)

I considered trying to cut with an xacto knife out of paper, but trying my hand at painting seemed more doable.

Look at my $5 craigslist paint stash! I pulled out some brown, antique white, gold, and black.
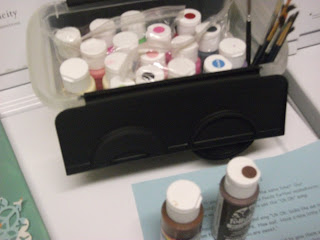
Now, keep in mind this is my first time painting! I painted out PEACE, the roots and trunk. it looked ok.

I went ahead and glued down the "leaves" and coated the entire thing in 4 coats of modge podge.

After it dried, I stood there thinking I HATE THIS! It needed something more. Honey Bunny suggested grass, a bunny, and an attacking fox. Hmmm.
No pictures of the next painting process because I thought the project was scrapped and I could not make it any worse.
I took black and started adding details. I was channeling my inner Bob Ross. A happy little knot here and a slight touch of shadow there. It went over the modge podge surface with no problem!

Tada! I saved the project! Still not 100% in love with it. ..

Wednesday, January 26, 2011

Valentine's Day Game: Deal or No Deal


I needed a low cost gift for Honey Bunny on Valentine's Day. Not only is this gift fun, but the cost, ZERO! No gift I buy ever seems to impress him much so hopefully I can wow him with this!

So you've seen the game show "Deal or No Deal?" The basic concept and rules carry on to my Valentine's Day edition. I have 15 hearts taped on my canvas. On the back of each heart is a "prize." At the beginning of our game Honey Bunny will pick one heart and I will whisk it away to a sealed envelope. Just for fun, I will not look at it. That's also why the hearts are not numbered. I am going to mix them up then tape them on without looking.

From there, Honey Bunny will choose hearts one at a time revealing what he has lost. I, then cross them off the list. This list will be posted next to the game board for him to see from the beginning. I didn't include a picture because some of it is for mature audiences only. WINK

Ok now Honey Bunny might be getting nervous. He may end up with a back pat for a prize. Odds are looking against him... RING RING... Oh it's the banker calling tempting him with Mrs. Bunny taking out the trash for 2 weeks! Thank goodness there's no commercial breaks and Howie Mandel in my edition!

So you get the basic idea. A little creativity and you got Valentine's night at my house!

Christmas Ornaments to Funky Kissing Balls

I really love the look of crepe paper rose kissing balls. I thought I would give it a try. Most tutorials I've seen fasten the roses to a styrofoam ball. Instead of running to the store I shopped the Christmas ornaments. I took small round glass ball ornaments to stand in for the styrofoam ball. It worked just fine.
Originally, I was going to make a cluster of crepe paper kissing balls, but I was frustrated with variation of size and height of the roses. I knew I would go crazy making a herd of these.
Then I saw the Christmas stash! I was struck with inspiration. I opened the craft cabinet and started pulling out ribbon and glitter that looked Valentiney.
I glitterized a larger ball ornament. I wrapped ribbon around a cone shaped one. Did you notice the poofy one? It looks like a wadded up ball of curling ribbon - that's because it is! I just randomly glued on a round ornament then stuck and shaped the ribbon. I added some mini glitterized ornaments to the top.
I hung everything up with ribbon and tacks at varying height. The ornaments already had a hanger - so easy!
Its not perfect but is a great excuse for a smooch!
Check back this week, I'm working on a Deal or No Deal Valentines Day game to play after the kids are in bed. Oh and its a no cost gift that you both can share !

Tuesday, January 25, 2011

Our Grove, Hand Trees


The original inspiration came from At Second Street
I used scrapbook paper, canvas, and modge podge.

First, with some left over yellow paint I gave the canvas a nice coat of color.
Using my Cricut Plantin Schoolbook cartridge I cut oodles of leaves in different sizes, patterns, and variations of the leaf.
I couldn't fill a whole canvas with one kid so I decided to fit the whole family in!
I gathered all the family and drew an outline of their hand. I loosely placed each hand on the canvas to see where each tree would fit. With a pencil, I lightly sketched a "cloud" above each hand to guide my leaf placement.
I just went to town shaping my trees with podge coated leaves. I stuck the hand trunks of top and coated the whole thing with 5 coats of modge podge.
I did a Little Starry Night action with the modge podge in the background for texture and interest. (which couldn't be captured by my camera)
More of an afterthought, I added Our Grove in the corner with scraps.

Kaleen@ At Second Street gives a detailed tutorial with lots of photos.

Sharing

Let's Make It Now: Shopping Bag Holder

Let's make it right now! Pesky shopping bags all over in the cabinet?
Grab a coffee can, a knife, and shopping bags. Cut a big X in the lid and stuff your bags in. All done and a little more organization. Yay!
A nice coat of spray paint could pretty this up quick, but its too cold here.
I'm off to make another for the upstairs bathroom and one for the van! So handy and my coffee can stash in use instead of waiting clutter. Double whammy!

Sunday, January 23, 2011

A Home for a Bunny

In the Spring a bunny
came down the road.
He was going to find
a home of his own.
A home for a bunny,
A home of his own,
Under a rock,
Under a stone,
Under a log,
Or under the ground.
Where would a bunny find a home?
Margaret Wise Brown